Showing posts with label projects. Show all posts

Tuesday, May 20, 2014

Blanket Statement

I first learned to crochet when I was 12.  My mom would make those funky ("funky" in a good way) ripple afghans and they were remarkably cozy and practical.  I watched her and picked up on the double stitch ripple groove and made about 10 afghans one year.  Sadly, after compulsive coverlet creating, I kind of fizzled out and focused on smaller projects for the next few decades.

"Citrus Rose"
Several weeks ago, our younger daughter asked me to crochet a blanket for her.  I thought, "why not?" We looked over some ideas on Ravelry and we always love the beautiful designs and ideas from Lucy of Attic 24.  We went with the Granny Stripe Blanket.  After the initial 2 starting rows, which are mostly just long and a bit boring, the rest is a breeze!  There are so many options here.  You can go crazy with color or keep it refined.  You can crochet lengthwise or widthwise, depending on how you want your stripes to run.  I went with assorted colors from my cotton Sugar N' Cream stash, we call the finished product "Citrus Rose."  For the edging, I used a basic shell stitch.  

"Violet Bluebell"

Of course, our older daughter wanted one immediately after feeling the airy, yet cozy softness of the triple-crocheted granny stripe stitch. Since she loves blues, I went with a cooler-hued stash to create "Violet Bluebell."  I used a different edging here, I'm not sure what the appropriate name for it is.  Basically, I start with a shell stitch and add a picot stitch to the middle of the shell.  

These blankets are perfect for this time of year, especially when they are made of cotton yarn.  You could also use a double stitch as opposed to triple, to create a slightly tighter feel to the blanket.  Thicker, woolier yarn would also add warmth, if you need that.  


Wednesday, February 12, 2014

Hues of Blues

My kids often ask me the burning question, "Mommy, what is your favorite color?"  Of course, I never have a simple answer.  It usually goes something like... "Well, it depends on the setting and the situation.  I love green trees, periwinkle skies, to wear I prefer blacks, dark plums, ... " and it continues.  If I had to choose just one color, I would probably say green.  When I look at my Etsy shop, however, there are a lot of blues.

I did a little statistical observation and examined the first 6 pages of my Etsy shop.  I calculated the percentage of items in certain colors and the results were, well, not remotely shocking or exciting.

Blue won, with 34% of the listings being predominantly blue.


First runner up was green, with 31%.


I was a little surprised that only 16% was purple (with some lavender/pink hues).


I intentionally made my 2nd page predominately warm colors.  Red/orange is still only 14%.


Anyone preferring yellows and golds would probably not be that excited about my shop.  Only 5% of the items are in those hues.  I did not count the brass finish on some of my jewelry items, mostly I looked at the images featured.


I only have a trivial amount of white/grey listings.  This means I am rarely a candidate for Etsy's front page!
This item actually made it to the front page. 

What does this all mean?  It probably means it wouldn't hurt for me to get crazy and paint a few yellow/golden tree and forest scenes.  

Wednesday, February 5, 2014

Scenes from a Fairy Tale Wedding

A while back, I had the pleasure of working with a lovely bride who wanted me to paint a backdrop for her wedding.   Since I had to ship this huge slab of artwork from the U.S. to South Africa, I needed something lighter than a traditional canvas.  I used curtains.  Yes, curtains.  Large, canvas-like curtains.  After adding layers, layers, and more layers of acrylic paint, the curtains felt more like heavy vinyl but I was pleased with the end result.


She sent me so many gorgeous photos!  Notice the bride is wearing one of my pendants...


...and Twig Studio bookmarks were wedding favors!


The bride and groom were adorable and the setting was absolutely magical!  


Apparently, the donkeys got to sample the bouquet!  

Happily ever after, you two!  


Monday, April 16, 2012

Strings and Stitches

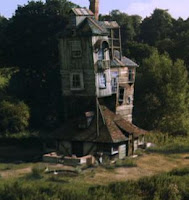
The Burrow
I come from the Molly Weasley school of sewing and stitchery.  It may be crooked and frayed, but if you add enough lace and pretty fabrics,  nobody will notice... much.

My seams are crooked, there are strings all over the place, but I love making pretty little things the girls enjoy wearing.  I am getting better, really, I am!

the bodice was way off...
the bodice fits but the tiers are totally wonky...

This skirt has been my favorite project so far.  I have made two, one for each girl, and they are actually presentable enough to wear out of the house!  The girls love them!  I still need to work on my crooked seams and amateur techniques.  I roughly used McCall's pattern M6066 for the main part of the skirt.  I'm horrible at reading patterns and impatient with those flimsy sheets of... whatever that is, but it's nice to have a guideline for the basic foundation of whatever you are making.  

Saturday, April 7, 2012

Natural Dyes for Easter Eggs

These are a bit more time consuming than the food coloring method, but a lot more interesting!  The kids were excited by the whole process and even though the house smelled like cooked onion, cabbage, and vinegar (with a hint of boiled egg), it was well worth the smell and the effort.

We soaked all of the eggs overnight.  I was most impressed with the lovely shade of yellow that resulted from boiled carrot tops, cumin, and celery seed, and equally impressed with the beautiful blue eggs that emerged from the purple cabbage water.

I found most of my dye recipes here, but next year I will try using spinach instead of onions to make green dye.  Red/purple cabbage is perfect, beet juice was pretty but still too pale... next year I will try chopping twice as many beets to make a more concentrated dye.

Happy Easter!

Wednesday, February 8, 2012

Creating Art Jewelry

The first time I took one of my 24" x 36" paintings, warped it down to a 25mm sphere, and created a pendant necklace I was ecstatic!  I was instantly addicted to making art jewelry, rings, lockets, earrings, pendants... I even have parts for hair pins but I have yet to make those.
Secret Grove ring

If you would like to create art jewelry there are some simple THINGS YOU NEED TO KNOW...

1.  Do not use artwork that you did not create unless the artist left this world a long time ago.  Exceptions:  your child's artwork (if the jewelry is for personal use/gifts or charity);  old postcards or scrapbook paper;   other artists' work if you have permission in writing.  ALSO... do not assume that you are not an artist!  You do not need elaborate paintings or detailed work to create art jewelry.  Simple, colorful, and whimsical can be just as beautiful in the right setting as Mona Lisa!

2.  Do not sell the very first few pieces you create.  Wear them yourself or ask friends/family to test them for you.  Fortunately, I gave my first pendant necklaces to my mother and mother-in-law.  My MIL sent me an e-mail a few days later to tell me the chain had broken and I was quite glad to know!  After that I only ordered higher quality chains -- ball chains do not have a long life span and I did not want my artwork dangling from something flimsy.  

3.   You CAN use inkjet printed images, just seal them first.  Personally,  I like to use Mod Podge Satin or Judi Kins MicroGlaze.  Be sure to let them dry for at least 12-hours (preferably 24 hours with the MicroGlaze).

Starry Meadow locket
4.  Start out simple and small.  Make a few inexpensive pendants first before diving into fancy settings and oddly-shaped cabochons.  You will need to get used to gluing in a manner that creates a clear image without annoying bubbles or tears.  

5.  Use settings that suit your artwork.  If you paint pastel bicycles, they would probably look odd in a fancy setting like the one above.  However, in a basic pendant setting or locket they would look extraordinary, at least in my imagination.  There are always exceptions, of course.  

6.  A lot of work and experimentation goes into making art jewelry, especially if you are using large, rectangular images.  You will need to crop, shrink, warp, and probably warp some more.  Programs such as Corel Painter and PhotoShop help immensely.  

THINGS YOU WILL NEED....

1.  digital images of artwork, unless you are using old postcards or scrapbook paper (in some cases you may want to take digital images of these to use instead of the original).

2.  a photo editing program such as Corel Painter or PhotoShop, as well as a little photo editing experience and/or sheer determination

3.  a printer, laser is recommended but you most certainly can use inkjet images (see #3 above)

4.  card stock for printing images

Arabella earrings
5.  if you are using inkjet images, a paper sealant such as Mod Podge or Judi Kins MicroGlaze (again, see #3 above)

6.  very sharp scissors and/or paper punches in various sizes, depending on the size(s) of the cabochon settings you will be using

7.  jewelry and finding supplies - There are tons of these on Etsy with wonderful reputations!  Just to name few I have worked with, Sun and Moon Craft Kits, Canterbury Lane, The Supply Factor, and Bunnysundries (again, that is only a few).  Rio Grande is another supplier with a reputation for wonderful customer service.

8.  glues and sealants - Diamond Glaze is awesome for applying the image to the glass cab ... just remember it dries quickly so you need to replace the cap immediately and work fast.   E-6000 is stinky but it works great for securing the cabochon to the setting.  Use E-6000 in a well-ventilated area (seriously) and do not buy the largest size possible.  I always look for the smaller sizes, even if it costs more per ounce.  I have never been through an entire bottle of E-6000 before having to replace it due to it's overwhelmingly sticky, messy nature.  As far as sealants, see #5.  Obviously there are alternatives to every product I am mentioning, I am just making suggestions based on what has worked best for me.  

9.  packaging and presentation - Create little information cards for your work, even if you are not selling but giving as gifts!   Package them in a pretty organza bag or a decorated jewelry box or tin.  The suppliers I listed above have packaging materials as well.  If you are shipping, be sure to use plenty of bubble wrap and mark the package as "fragile."  Just imagine someone sitting on your package and cushion appropriately.

10.  If you are going to sell your work, you need a good customer service policy.  Jewelry is going to break from time to time and there is a greater risk of customer disappointment with jewelry (I am speaking not only from my art experience but years of retail experience).  Personally, I want customers to have something they can enjoy for quite some time.  I don't care if it's just an inexpensive ring and I will never tell my customers what an employer at a major retailer told me once... "that's what you get when you only pay X amount for a necklace."  In the long run, it pays to be reliable, sincere, and genuinely devoted to the happiness your products should invoke. 

I'm sure I have left something out and I will edit accordingly.  I will post again with more details on creating, assembling, and editing images for jewelry.    


Pin It

Tuesday, January 17, 2012

Crochet Persuasion

It's not often that I purchase an entire book of crochet patterns... NEW!  Usually I look for crochet books at used book stores or the library, or I purchase individual patterns from Etsy.  Well... USUALLY I look for free patterns, but I seldom hesitate to purchase a pattern if it looks well-written.

I found this book on Amazon today, Austentatious Crochet:  36 Contemporary Designs from the world of Jane Austen by Melissa Horozewski.  My first project will be the "Eat Your Heart Out Willoughby" sweater!


"Eat Your Heart Out Willoughby" sweater
"Becoming Jane" sweater - free pattern here!


The "Becoming Jane" sweater (the green one) is also quite beautiful and it happens to be available for FREE on this blog.

Jane Bennet skirt
"A Ball at Netherfield" sweater


Pin It

Sunday, September 25, 2011

Woodland Cardigan

 My latest crochet project was larger than my usual scarf or bracelet but great fun!  I purchased a pattern for this beautiful cardigan, "The Ermeline Cardigan" from the Etsy shop of the very talented SylvChezPlum .  Of course I always like to add my own twist, but I was able to do so because of the clarity and design of this pattern.  Included in a 23-page e-book with beautiful images and 3 other patterns, this tutorial was worth every penny!  I wanted to add an appliqué to give it a "woodland" theme and I found the most gorgeous appliqué patterns at the Etsy shop of ch1306 .  I used slightly larger needles and yarn to make it usable as a pocket.


photo from ch1306's shop
There are tons of free patterns online for various projects, but I have found over the past few years that in most cases it is worth it to purchase a pattern, usually in the form of an e-book tutorial.  I have quite a few unfinished projects that started out as hopeful sweaters or potential dresses, but after struggling with a pattern that was incomplete or just completely vague, they became spare parts.  Of course, there are many patterns out there that are free and wonderful, but if I want to create something that could be tricky or time-consuming I usually look for reputable sources on Etsy or Ravelry.  There is an art to designing and writing a good pattern and I believe in supporting artists!

photo from SylvChezPlum's shop
SylvChezPlum's tutorial made the entire project enjoyable and I like how she created the layout of the cardigan.  As you can see from the image from her shop (right), her design is more polished.  I tend to add some whimsical elements to my work, mostly to pull the focus toward the slightly absurd and hopefully disguise the fact that my work is often a bit amateur and messy!  She also uses gorgeous, high quality yarn.  As I become more comfortable with this project I will probably move up to better quality yarn.  The kids are already asking for this is in several colors and pretty soon they will both have a brown one just like the one I finished.  Fortunately it is still quite warm so they are not fighting over this one yet!

I added a flower to the end of the hood to disguise a frayed end, made the sleeves flared (just because I love the look), and of course, added that lovely appliqué.  As I was stitching the appliqué to the cardigan, I left the top open to use as a little pocket for various treasures.   I also made the cardigan slightly longer and flared at the bottom.

Needless to say, both SylvChezPlum and ch1306 are on my list of favorite Etsy shops and I will be purchasing more from them.  It's so nice to have finished projects!

Saturday, August 13, 2011

Crochet Disarray

I love crocheting... sometimes.  I go through creative waves, sometimes I want to do nothing but paint, sometimes nothing but compose music, sometimes I fixate on making pretty trinkets, and for those times when I can sit still I like to crochet.  While most of my finished projects consist of cute little bracelets for the kids, several hats and cloches, leg warmers, hair bands, etc., I have an impressive selection of unfinished projects!  Actually, "embarrassing" is the better word -- there are half-sweaters, disembodied sleeves, almost finished hoods that turned out large enough for a giant troll, and lots of unidentifiable strips and squares.  Regardless of this questionable clutter and bags of hoarded yarn, I find crochet to be a healthy, enjoyable activity that is usually compatible with short bursts of "free time" between kids, housework, and business-related activities.
e-book pattern from Lullaby Lamb
this pattern is FREE on Ravelry
another free pattern


My kids love it when I crochet;  however, the frustration sets in when they want to crochet too!  Considering they are only 4 and 5, teaching them to crochet is pretty much impossible at this point and they have a hard time accepting this.  I try to assure them that when they are old enough (a crochet/knitting goddess told me 8 years old is a good time to start) I will be ecstatic to teach them!  While I love the ages they are now, I look forward to being able to spend time with them crocheting and making cool things.  My mom taught me how to crochet when I was... I think 12 (or slightly earlier).  One year I made about 20 afghans (the basic, groovy "wave" pattern) to give away as Christmas gifts!  

free pattern on Ravelry
felted bag by galafilc on Etsy
Clearly, the most rewarding and useful accessories I have made are legwarmers, scarves, hats, and the little bracelets and headbands that take about 10 minutes to make!   I made a little red sweater a couple of years ago and while it was not a difficult project, it was time-consuming and the outcome was a very heavy, bulky, crooked (the hood part) sweater that my daughter insisted on wearing when it was 80 degrees in her preschool building!  I eventually hid the sweater and vowed never to use such heavy yarn with a single-stitch project.  Then there was Mr. and Mrs. Fox.  They are very cute and the kids love them, but sewing all the parts together was frustrating because I never felt like everything was connected securely.  Another frustration with making kids' accessories, clothing, and toys is... the fraying.  Little legwarmers come home all fuzzy at the bottom and I cringe when I see them take a scarf off and drop it on the ground.  One of these days I am going to try felting!  Felted projects are not only gorgeous, they look more durable.  Of course, I don't think felted legwarmers are a good idea.  But how gorgeous is this felted bag (above) from galafilc on Etsy?!?  

Sometimes I catch myself up at 2 AM browsing Etsy or Ravelry for crochet patterns.  The other night/morning, I found a treasure trove of vintage patterns (mostly from the 70s) from wonkyzebra on Etsy (who is super nice, btw) and while I am usually not a fan of 70s fashion, these patterns are gorgeous and can be modified into something more modern and/or practical!  I purchased about 5 patterns, including the one pictured here in sage green.  I know, the dress, the pool, the shoes... how could I?  I'm thinking this would be beautiful in black or a deep, garnet red with a different neckline... perhaps a jewel neckline with picot edging and lose the buttons.  Make the wide sleeves slimmer while attempting to salvage a smaller version of the design around the cuff and lose just a tiny bit of fullness in the skirt (and/or make it shorter).  OR... you could create a lovely Victorian look using cream or grey yarn, keep the same collar with buttons, make the sleeves very slim and fitting with a slight flare at the cuff, and make the skirt a bit longer and less full.  This Victorian version would also look beautiful in black, although a bit more goth (I tend to tread delicately between the line of Victorian and goth).  

I also purchased this tunic dress pattern, which needs little or no modification!  It's wonderful and you could even make a sleeveless version!  Obviously it would be easy to modify the length of the sleeves and/or the dress if needed.  A shorter version would make a pretty tunic to wear with tights or leggings.  

Now that I have all of these cool projects and lots of yarn, I should make something.  For every finished project, there are probably 2 unfinished projects, 20 extra skeins of yarn, and 200 ideas!  

Wednesday, December 1, 2010

Painting on the Walls!

 There is something about painting directly onto a wall that feels so daring and wonderful!  It's like being a kid again, knowing that you aren't supposed to use those crayons on the wall but it just seems like the most fun thing to do.  So when our kids got naughty with some markers and also needed a bit of a room makeover, I took full advantage of the situation and painted murals in each room, not only hiding marker stains (Sharpie of course) but "wowing" them with their new bedroom artwork!  
 
After Thanksgiving dinner, my mother mentioned that she wanted something interesting on the wall in her dining room.  There was "too much white space" between the windows.  20 minutes later I found my dad's brushes and paints.  My brother was in a bit of shock, as it happened so quickly (he likes to think these things through for a very long time).  My dad was too overwhelmed by grandchildren for it to sink in, and my mom was mostly entertained by the whole event.  

If I have an opportunity to paint trees on someone's wall, I don't wait for them to change their minds!  I like the mural in their dining room.  With the lacy curtains it reminds me of something from a Scandinavian folklore storybook.  

Friday, December 11, 2009

Handmade Holiday Ornaments


These are very messy but a lot of fun!


You will need the following:


  • clear glass ornaments (found at Michaels and other craft stores)
  • floral moss (sheet moss, reindeer moss, etc., found at craft stores and florist shops)
  • small plastic berries, twigs, leaves, etc. (they have to fit through the opening in the ornament)
  • glue, preferably low odor (Tacky Glue works well and is available in clear)
  • small cheap paintbrush for applying glue (optional)
  • glitter (I prefer "crystal," which is a shimmery white color)
  • Diamond Dust (optional...if you use this please read and follow the "warning" on the label)
  • cheap, disposable "bowl" or jar (I use old salsa jars and large yogurt containers)
  • plastic spoons
  • a wire cutter (for trimming the artificial twigs, berries, etc.)
  • an accommodating workspace that can be cleaned up easily (I always use old newspapers to cover my work area)
Warning: This is not a project that I would recommend for children. The glass ornaments are fragile and they will shatter if handled improperly. Some glues need to be used in a well-ventilated area. If you happen to use a strong-smelling glue, let the ornaments air out for a few days in an appropriate area before placing the cover back onto the opening. Finally, Diamond Dust is BEAUTIFUL but it's basically tiny bits of crushed glass. Using glitter (preferably white...it looks classier) will achieve a similar effect.

Now for the fun part! Select which berries/twigs/mosses (I will call these "ingredients") you want to go inside of your ornament. Lightly coat parts of the ingredients with glue, then drop them into a bowl of glitter and/or Diamond Dust. Use the plastic spoon to swirl them around in the glitter, giving all the glued areas a good coating. Scoop them out and gently shake any excess glitter into the bowl. Carefully remove the cover from the opening of the ornament. Gently place your newly frosted flora into the opening. You may need to shake the ornament a little to arrange the flora properly. You can put as many "ingredients" into the ornament as you like, but I personally think that the ornaments are more striking with just a few simple components.
You can stop here unless you are daring. If you like the look, leave the ornament sitting out for a few hours without the cover, to allow the glue to dry. If you want to add a little more sparkle, carefully brush or squeeze some glue into the ornament along the sides. I like to just drizzle the glue directly into the ornament making circular patterns. Then pour a spoonful of glitter into the opening of the ornament, and swirl it around a few times. Make sure the glue areas are thoroughly covered with glitter, then gently shake out any excess. You can also add glitter to the outside of the ornament if you like.
This is an entertaining project that requires a bit of experimentation to determine the look(s) that you like. The ornaments look beautiful on the tree, especially when strategically placed near lights. I like to hang them around the dining room light fixture (see photo above) to dress it up for the holidays. Have fun!

(I realize that I have about 5 different fonts in this post... it's not by choice).